“Linux内核-5寸触摸屏驱动移植”的版本间的差异
来自华清远见研发中心
(创建页面,内容为“==实验原理== FS-MP1A使用的是GT911触摸芯片,通过I2C2总线与SoC进行数据交互。 Image:54-1-1-1.png <br> 查看原理图确认I2C2管脚对...”) |
(没有差异)
|
2020年7月28日 (二) 11:17的版本
实验原理
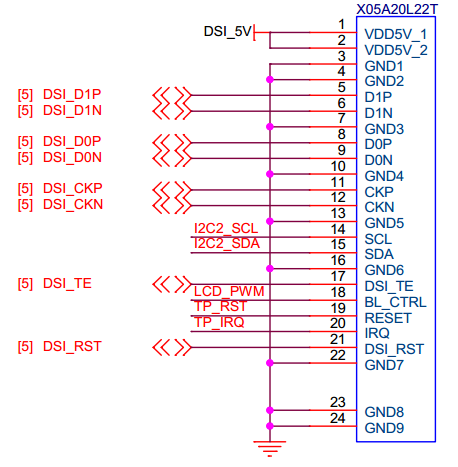
FS-MP1A使用的是GT911触摸芯片,通过I2C2总线与SoC进行数据交互。
查看原理图确认I2C2管脚对应关系:
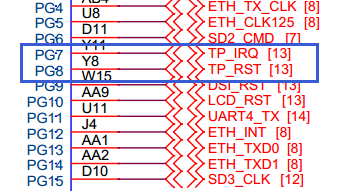
查看原理图确认中断管脚TP_IRQ和复位管脚TP_RST管脚对应关系:
| 原理图网络编号 | 对应管脚 | 管脚功能 | 管脚功能码 |
|---|---|---|---|
| I2C2_SCL | PH4 | I2C2_SCL | AF4 |
| I2C2_SDA | PH5 | I2C2_SDA | AF4 |
| TP_RST | PG8 | GPIO | |
| TP_INT | PG7 | INT |
- I2C2设备树节点
I2C节点添加与HDMI中对应I2C的内容一致,本节不再重复。
- 触摸屏设备树节点
参考文档:
devicetree/bindings/input/touchscreen/goodix.txt
参考goodix.txt及ST提供的I2C相关设备树文档,触摸屏节点内容如下:
touchscreen@5d {
	compatible = "goodix,gt911";
	reg = <0x5d>;
	irq-gpios = <&gpiog 7 (GPIO_ACTIVE_HIGH | GPIO_PULL_UP)>;
	reset-gpios = <&gpiog 8	GPIO_ACTIVE_HIGH>;
	interrupt-parent = <&gpiog>;
	interrupts = <7 IRQ_TYPE_EDGE_FALLING>;
	status = "okay";

	// touchscreen-inverted-x;
	touchscreen-inverted-y;
	// touchscreen-swapped-x-y;
};
实验目的
熟悉基于Linux操作系统下的MIPI 触摸屏设备驱动移植配置过程。
实验平台
华清远见开发环境,FS-MP1A平台;
实验步骤
- 修改设备树
修改arch/arm/boot/dts/stm32mp157a-fsmp1a-mipi050.dts文件,在文件末尾增加如下内容:
&i2c2 {
	pinctrl-names = "default", "sleep";
	pinctrl-0 = <&i2c2_pins_a>;
	pinctrl-1 = <&i2c2_pins_sleep_a>;
	i2c-scl-rising-time-ns = <100>;
	i2c-scl-falling-time-ns = <7>;
	status = "okay";
	/delete-property/dmas;
	/delete-property/dma-names;

	touchscreen@5d {
		compatible = "goodix,gt911";
		reg = <0x5d>;
		irq-gpios = <&gpiog 7 (GPIO_ACTIVE_HIGH | GPIO_PULL_UP)>;
		reset-gpios = <&gpiog 8	GPIO_ACTIVE_HIGH>;
		interrupt-parent = <&gpiog>;
		interrupts = <7 IRQ_TYPE_EDGE_FALLING>;
		status = "okay";

		// touchscreen-inverted-x;
		touchscreen-inverted-y;
		// touchscreen-swapped-x-y;
	};
};
- 配置内核
由于内核源码默认配置以及支持sii902x,本节列出主要选项,如下:
linux@ubuntu:$ make menuconfig
Device Drivers  --->
	Graphics support  --->
		<*> Direct Rendering Manager (XFree86 4.1.0 and higher DRI support)  --->
		<*> DRM Support for STMicroelectronics SoC Series
			Display Interface Bridges  --->
				<*> Silicon Image sii902x RGB/HDMI bridge
- 编译内核级设备树:
linux@ubuntu:$ make -j4 uImage dtbs LOADADDR=0xC2000040
- 重启测试
将编译好的设备树和内核镜像拷贝到/tftpboot目录下,通过tftp引导内核,设备连接MIPI屏幕,重启设备后查看/dev会多出event0的信息,这是点击屏幕会的到反馈。
root@fsmp1a:# ls /dev/input


