扩展板振动马达驱动移植
实验原理
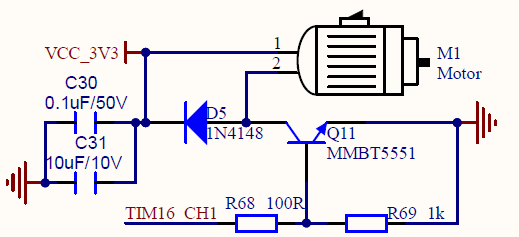
打开扩展板原理图对照扩展板可以看到扩展板有1个振动马达M1,如下图:

由上图可见可通过TIM16_CH1电平改变控制电路的通断从而驱动线性马达。

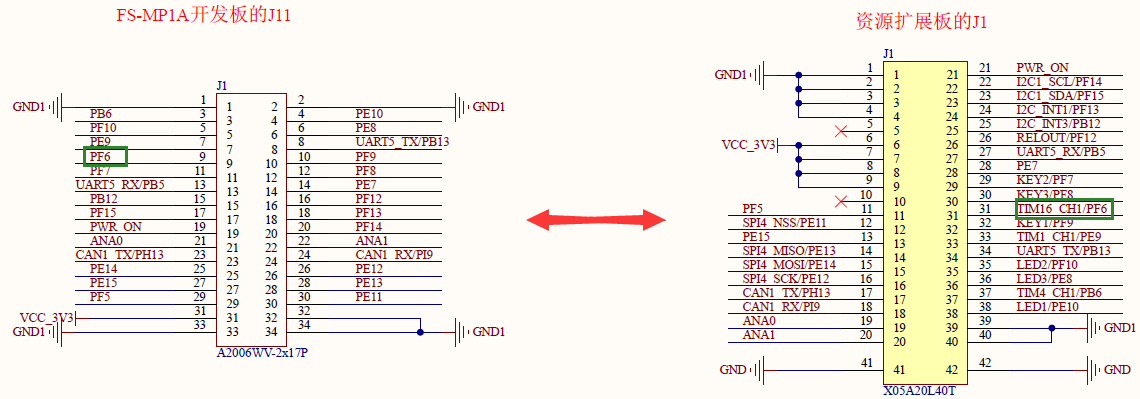
查看原理图可知TIM16_CH1对应PF6,查看芯片手册可知PF6可以作为PWM TIMER16的通道1使用,本文实现如何通过PWM驱动振动马达:
| 原理图网络编号 | 对应管脚 | 管脚功能 | 管脚功能码 |
|---|---|---|---|
| TIM16_CH1 | PF6 | TIM16_CH1 | AF1 |
实验平台
华清远见开发环境,FS-MP1A平台
实验步骤
- 导入交叉编译工具链
- 内核配置
- 修改设备树
- ……
- pwm16_pins_a: pwm16-0 {
- pins {
- pinmux = <STM32_PINMUX('F', 6, AF1)>; /* TIM16_CH1 */
- bias-pull-down;
- drive-push-pull;
- slew-rate = <0>;
- };
- pins {
- };
- pwm16_sleep_pins_a: pwm16-sleep-0 {
- pins {
- pinmux = <STM32_PINMUX('F', 6, ANALOG)>; /* TIM16_CH1 */
- };
- pins {
- };
- 重新编译内核和设备树文件
- 更新系统内核和设备树
- 测试
linux@ubuntu:$ source /opt/st/stm32mp1/3.1-openstlinux-5.4-dunfell-mp1-20-06-24/environment-setup-cortexa7t2hf-neon-vfpv4-ostl-linux-gnueabi
内核中为振动马达提供了标准的驱动,只要在内核中配置对应选项即可,驱动路径为:
drivers/input/misc/pwm- vibra.c
执行make menuconfig配置内核对应选项
linux@ubuntu:$ make menuconfig
Device Drivers  --->
	Input device support  --->
		[*]   Miscellaneous devices  --->
			<*>   PWM vibrator support
参考linux内核文档:
Documentation/devicetree/bindings/pwm/pwm-stm32.txt
Documentation/devicetree/bindings/input/pwm-vibrator.txt
修改设备树文件:
arch/arm/boot/dts/stm32mp157a-fsmp1a-extended.dts
由于timers16在stm32mp151.dtsi中已完成定义,这里需要在原有基础添加与硬件对应的相关信息,在文件stm32mp157a-fsmp1a-extended.dts末尾继承并添加timers16相关内容:
&timers16 {
	/* spare dmas for other usage */
	/delete-property/dmas;
	/delete-property/dma-names;
	status = "okay";
	pwm16: pwm {
		pinctrl-0 = <&pwm16_pins_a>;
		pinctrl-1 = <&pwm16_sleep_pins_a>;
		pinctrl-names = "default", "sleep";
		#pwm-cells = <2>;
		status = "okay";
	};
	timer@16 {
		status = "disabled";
	};
};
仿照设备树对于pwm管脚的配置添加timers16 pwm输出管脚配置,在stm32mp157a-fsmp1a-extended.dts文件pinctrl节点中添加pwm16管脚信息,红色字体内容为添加内容:
&pinctrl {
};
最后在根节点下添加振动马达驱动对应节点:
vibrator {
	compatible = "pwm-vibrator";
	pwms = <&pwm16 0 4000000>;
	pwm-names = "enable";
	direction-duty-cycle-ns = <10000000>;
};
linux@ubuntu:$ make -j4 uImage dtbs LOADADDR=0xC2000040
系统启动后可以查看目录/dev/input
root@fsmp1a:~# ls /dev/input/
by-path  event0  event1 event2
如果系统中有多个input设备,这里可能会有很对eventx,确定哪个event文件是我们的设备文件,可以通过查看/dev/input/by-path或查看dmesg系统启动信息确认:
查看by-path目录下文件
root@fsmp1a:~# ls /dev/input/by-path/ -l
total 0
lrwxrwxrwx 1 root root 9 May 30 08:43 platform-40013000.i2c-event -> ../event2
lrwxrwxrwx 1 root root 9 Jun 30 07:40 platform-beeper-event -> ../event0
lrwxrwxrwx 1 root root 9 Jun 30 07:40 platform-vibrator-event -> ../event1
由显示信息可以确认event1是振动马达的设备文件
编写测试程序测试:
编写测试程序或参考:“光盘资料:华清远见-FS-MP1A开发资料\02-程序源码\06-资源扩展板测试程序\02-vibrator_test”
pwm-vibrator.c
#include <stdio.h>
#include <fcntl.h>
#include <string.h>
#include <errno.h>
#include <unistd.h>
#include <linux/input.h>
#include <sys/ioctl.h>

int main(const int argc, const char **argv)
{
    int fd;

    if (argc != 2) {
        printf("usage: %s <device-file>\n", argv[0]);
        return 1;
    }

    fd = open(argv[1], O_RDWR);
    if (fd < 0) {
        printf("Error opening file '%s': %s\n", argv[1], strerror(errno));
        return 1;
    }

    int num_effects;
    if (ioctl(fd, EVIOCGEFFECTS, &num_effects) < 0) {
        printf("Error getting number of effects playable at the same time: %s\n",
strerror(errno));
        return 1;
    }
    printf("%d effects playable at the same time\n", num_effects);

    struct ff_effect effect;
    effect.type = FF_RUMBLE,
    effect.id = -1,
    effect.u.rumble.strong_magnitude = 0xFFFF;  //调节振动强度
    effect.u.rumble.weak_magnitude = 0;
    effect.replay.length = 3000;                  //调节振动时长ms
    effect.replay.delay = 0;

    if (ioctl(fd, EVIOCSFF, &effect) < 0) {
        printf("Error creating new effect: %s\n", strerror(errno));
        return 1;
    }
    printf("New effect ID: %d\n", effect.id);

    struct input_event play = {
        .type = EV_FF,
        .code = effect.id,
        .value = 1
    };

    if (write(fd, (const void*) &play, sizeof(play)) < 0) {
        printf("Error writing effect to file: %s\n", strerror(errno));
        return 1;
    }

    printf("Wrote effect\n");
    sleep(3);

    return 0;
}
交叉编译测试程序并将编译好的测试程序下载到板子上,执行程序如下:
root@fsmp1a:~# ./vibrator_test /dev/input/event1
16 effects playable at the same time
New effect ID: 0
Wrote effect
这时可以听到振动马达振动的声音。